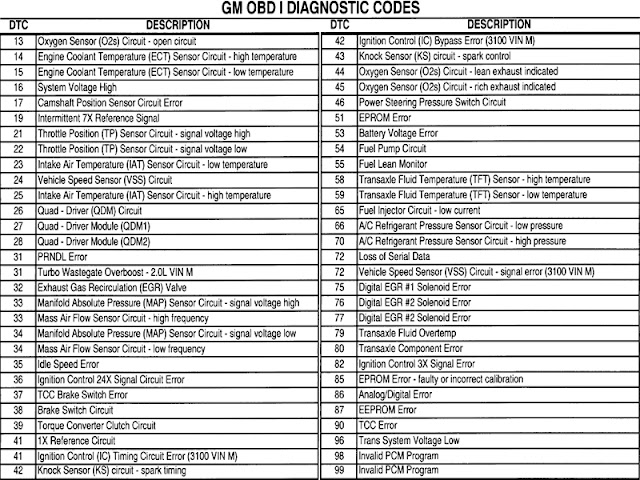
Some 95 and older GM vehicles were implemented with a diagnostic connector called OBD 1 or ALDL. There is a simple method to retrieve the codes stored on the on-board computer. First you will need to find the connector, usually located under the driver side dash. Take a paper clip and unwind it, then bend it into a U shape. Insert one end of paper clip into the A terminal and the other end into B terminal. This will ground the diagnostic terminal. Now turn the ignition key to the on position (do not start), the check engine light will start to flash! Take note of how many flashes. First it should flash once, a brief pause, then two flashes in quick succession. This is code 12. This code indicates your diagnostic system is working properly. After flashing code 12 three times your system will flash stored codes, Example: Flash Flash, Pause, Flash. This is code 21. After a codes flashes three times, it will move on to the next code. So have a pen and paper ready! Below is a list of most common codes that will appear for GM vehicles.
You now have a great idea of where to look for your problem and an understanding of why your check engine light is on. Once you have made the necessary repairs, you can now reset the engine light by disconnecting the negative battery cable for 10 seconds and then reconnect the battery cable. Hope this article was helpful! Please feel free to add comments or questions. Thank you.


This post is genuinely incredible. I really like this post. It is remarkable among different posts that I ve read in a long time. You shake for this alright post. I genuinely welcome it! Website
ReplyDeleteGood website! I truly love how it is easy on my eyes it is. I am wondering how I might be notified whenever a new post has been made. I have subscribed to your RSS which may do the trick? Have a great day! PSN code generator
ReplyDelete